This repository is a collection of tools and demo projects to help you get started creating your own embedded keyword spotting system with machine learning. Keyword spotting (or wake word detection) is a form of voice recognition that allows computers (or microcontrollers) to respond to spoken words.
Please note that because we are targeting embedded systems (namely, microcontrollers), this demo is very limited. You will likely only be able to train a system to recognize 1 or 2 words at a time. Anything more than that will require a more powerful microcontroller with more memory.
Hackaday Remoticon workshop slides can be found here.
WARNING! Avoid getting liquid (rubbing alcohol, water, etc.) in the MEMS microphone hole. If you do, you might permanently damage the microphone. Ask me how I know.
- embedded-demos/ - Collection of keyword spotting projects for various microcontroller development boards
- images/ - I needed to put pictures somewhere
- dataset-curation.py - Run this locally to perform data curation and augmentation; it combines custom wake words with the Google Speech Commands dataset and mixes samples with background noise
- ei-audio-dataset-curation.ipynb - Run this in Google Colab if you want to do data curation and augmentation remotely
- utils.py - A few functions to help with dataset curation
This project relies on the Google Speech Commands dataset as a starting point for your keyword spotting system. You may choose any word(s) from that set to be your keyword(s). Additionally, you may record your own samples to use in addition to the Google Speech Commands dataset.
If you decide to record your own samples, please follow these recommended guidelines:
- Samples should be 1 second long, mono, in raw (.wav) format
- Each sample should contain only 1 utterance of the keyword
- Samples of each category need to be contained in a directory named for that category
- Try to get at least 50 samples. Over 100 is better. Over 1000 is best.
- Samples should contain a variety of pronunciations, accents, inflections, etc. for a more robust model
You can use your computer, smartphone, or any handheld audio recording device to record samples. I recommend something like Audacity to edit the audio and extract 1 second samples.
Store your samples in a directory structure as follows. The filename of each sample does not matter, but the name of the category directory does matter (it will be read by the scripts to determing category names). The example "keyword_1" and "keyword_2" directories would be your categories, such as "cat" and "dog."
|- custom_keywords
|--- keyword_1
|----- 000.wav
|----- 001.wav
|----- ...
|--- keyword_2
|----- 000.wav
|----- 001.wav
|----- ...
|--- ...
You are welcome to use my collection of spoken words/phrases from this repository.
Once we have samples, we need to curate our dataset. To do this, we're going to combine any custom samples with the Google Speech Commands dataset, mix the samples with background noise, and upload them to Edge Impulse. There are two ways to do this: run a Jupyter Notebook remotely in Google Colab or run the data-curation.py script locally on your machine.
For both options, you will need to create an account on Edge Impulse. Once you have signed in, create a new project (e.g. "keyword-spotting-01").
This is the best option if you have a slow Internet connection or don't want to mess with Python on your computer.
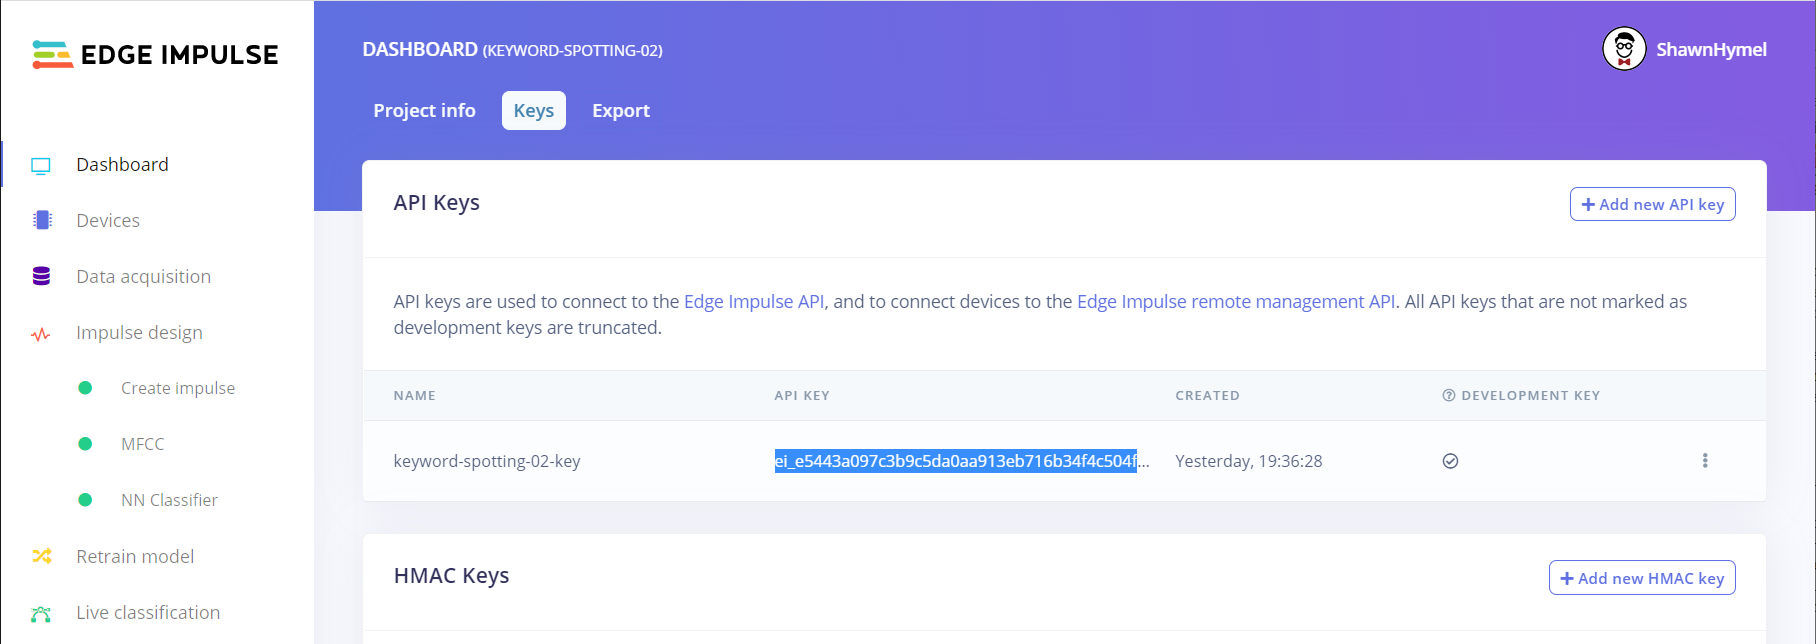
Go into your project on Edge Impulse, select Dashboard > Keys. Copy the API key.
Create a Google Gmail account, if you do not already have one.
Click this link to open the curation notebook in Colab:
Follow the instructions in the Notebook to mix and curate your own dataset.
Note that in the ### Settings cell, you will need to adjust a few variables.
- Leave
CUSTOM_KEYWORDS_PATHas an empty string ("") if you wish to just use the Google Speech Commands dataset or set it to the location of your custom keyword samples directory - Paste in your Edge Impulse API key (as a string) for
EI_API_KEY - Set your desired target keywords as a comma-separated string for
TARGETS(note that you might need to come back to this once you have downloaded the Google Speech Commnads Dataset and browsed the available keywords)
Run the rest of the cells (use 'shift' + 'enter' to run a cell). Data will be automatically split between training and test sets, and it will be uploaded to your Edge Impulse project.
Download the Google Speech Commnads dataset.
Install Python on your computer. Use pip to install the following packages:
- numpy
- librosa
- soundfile
- shutil
Download this repository. From the repository's directory, run the dataset-curation.py script, pointing it to the Google Speech Commands dataset and custom keyword dataset directory (if you have one). An example call looks like:
python dataset-curation.py \
    -t "go, stop" -n 1500 -w 1.0 -g 0.1 -s 1.0 -r 16000 -e PCM_16 \
    -b "../../Python/datasets/background_noise" \
    -o "../../Python/datasets/keywords_curated" \
    "../../../Python/datasets/speech_commands_dataset" \
    "../../Python/datasets/custom_keywords"
If you need help, enter python dataset-curation.py -h for information on the parameters.
When the script is finished, head to Edge Impulse, log in, and open your project. Click on Data Acquisition and click on the upload button.
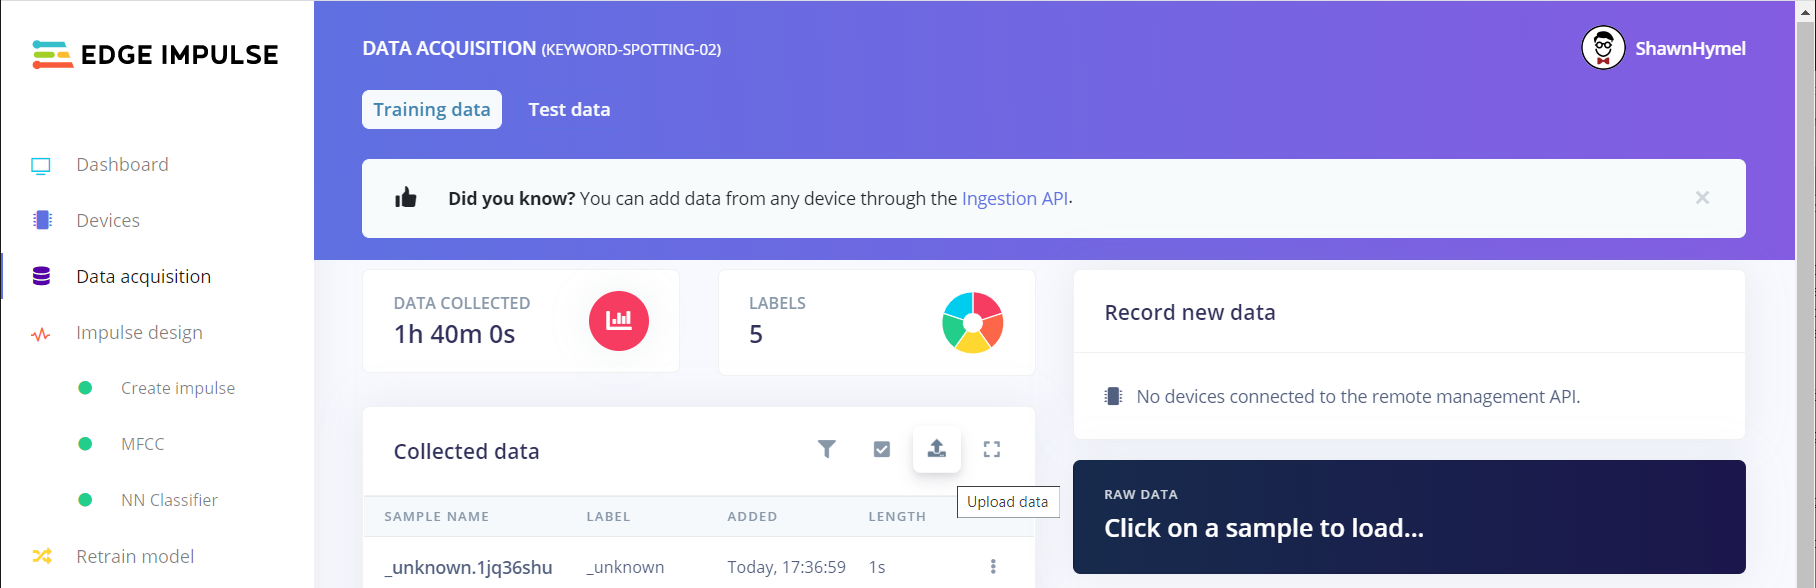
Select all of the curated/mixed audio files for one category. Let Edge Impulse automatically split between training and testing, and let it infer the label from the filename. Repeat this process for all of the .wav files in each category.
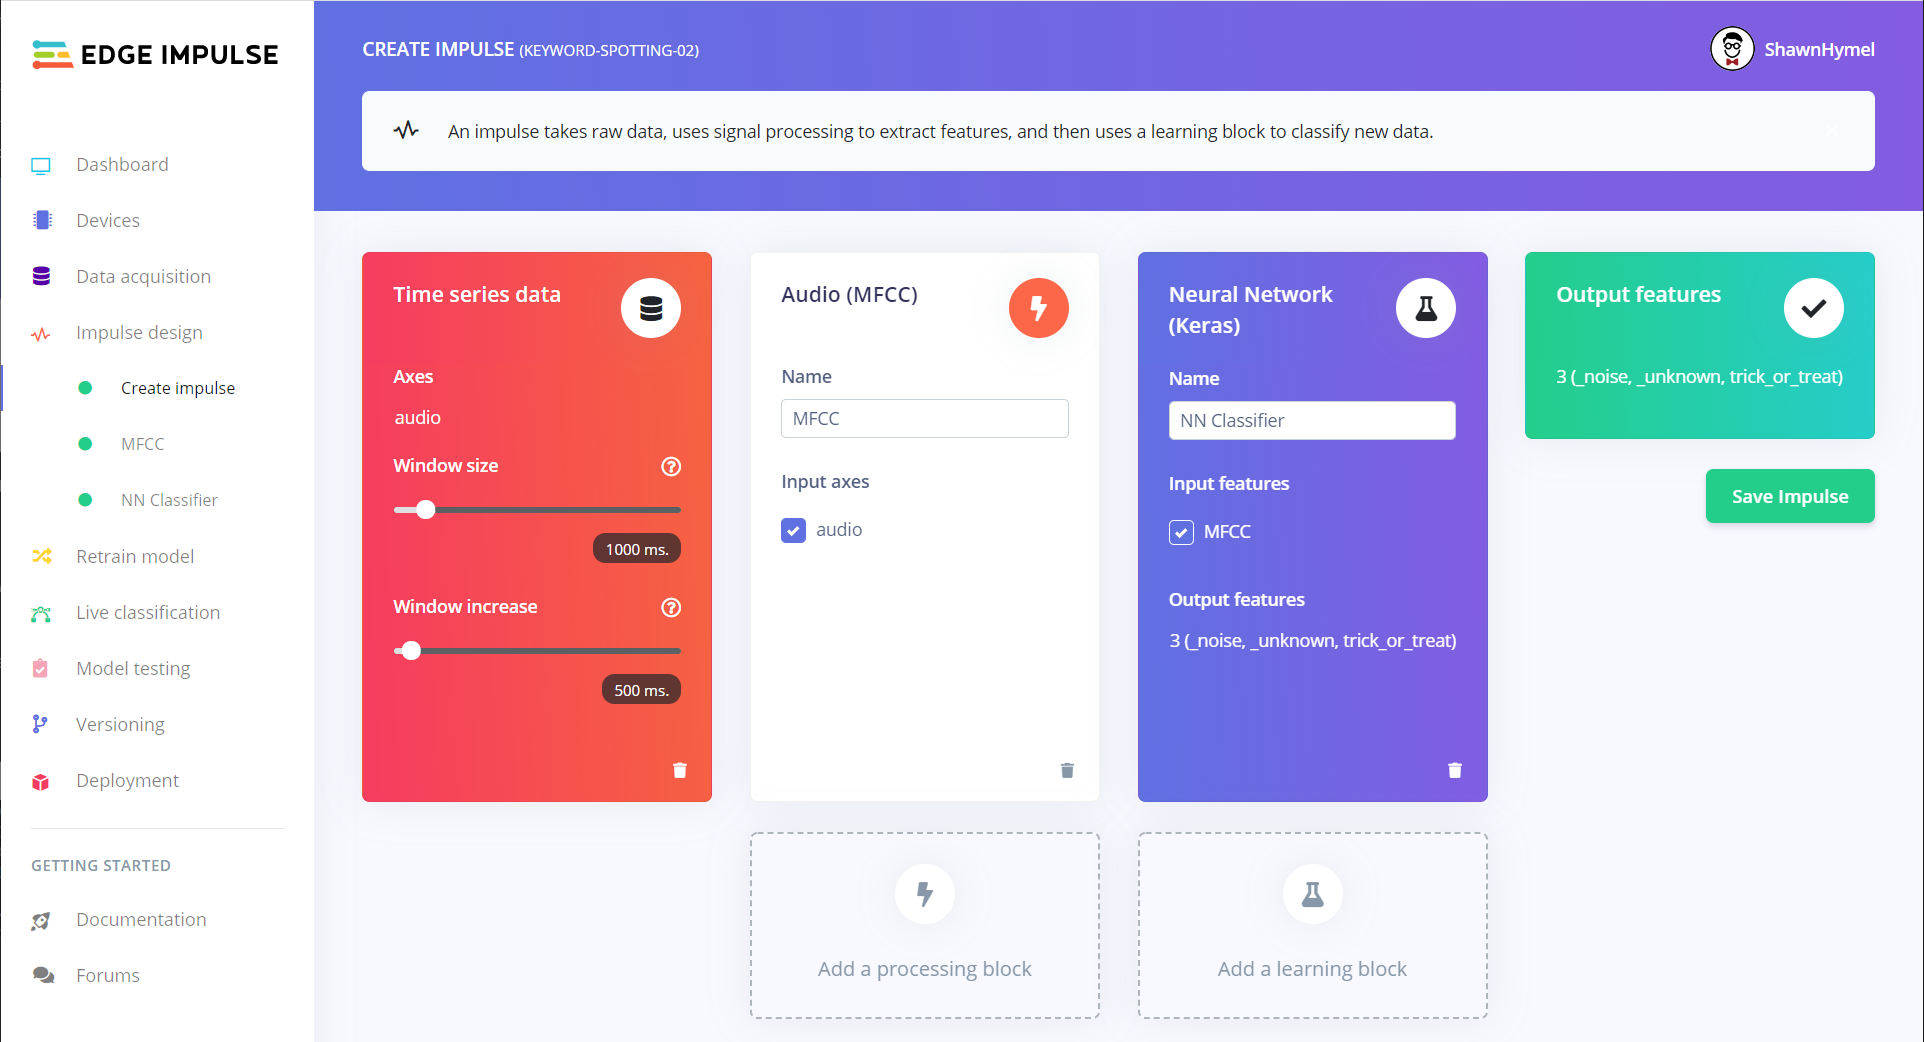
In your Edge Impulse project, click on Impulse Design in the left pane. Add an Audio (MFCC) processing block and a Neural Network (Keras) learning block. Keep all of the settings at their defaults for each block. Click Save Impulse.
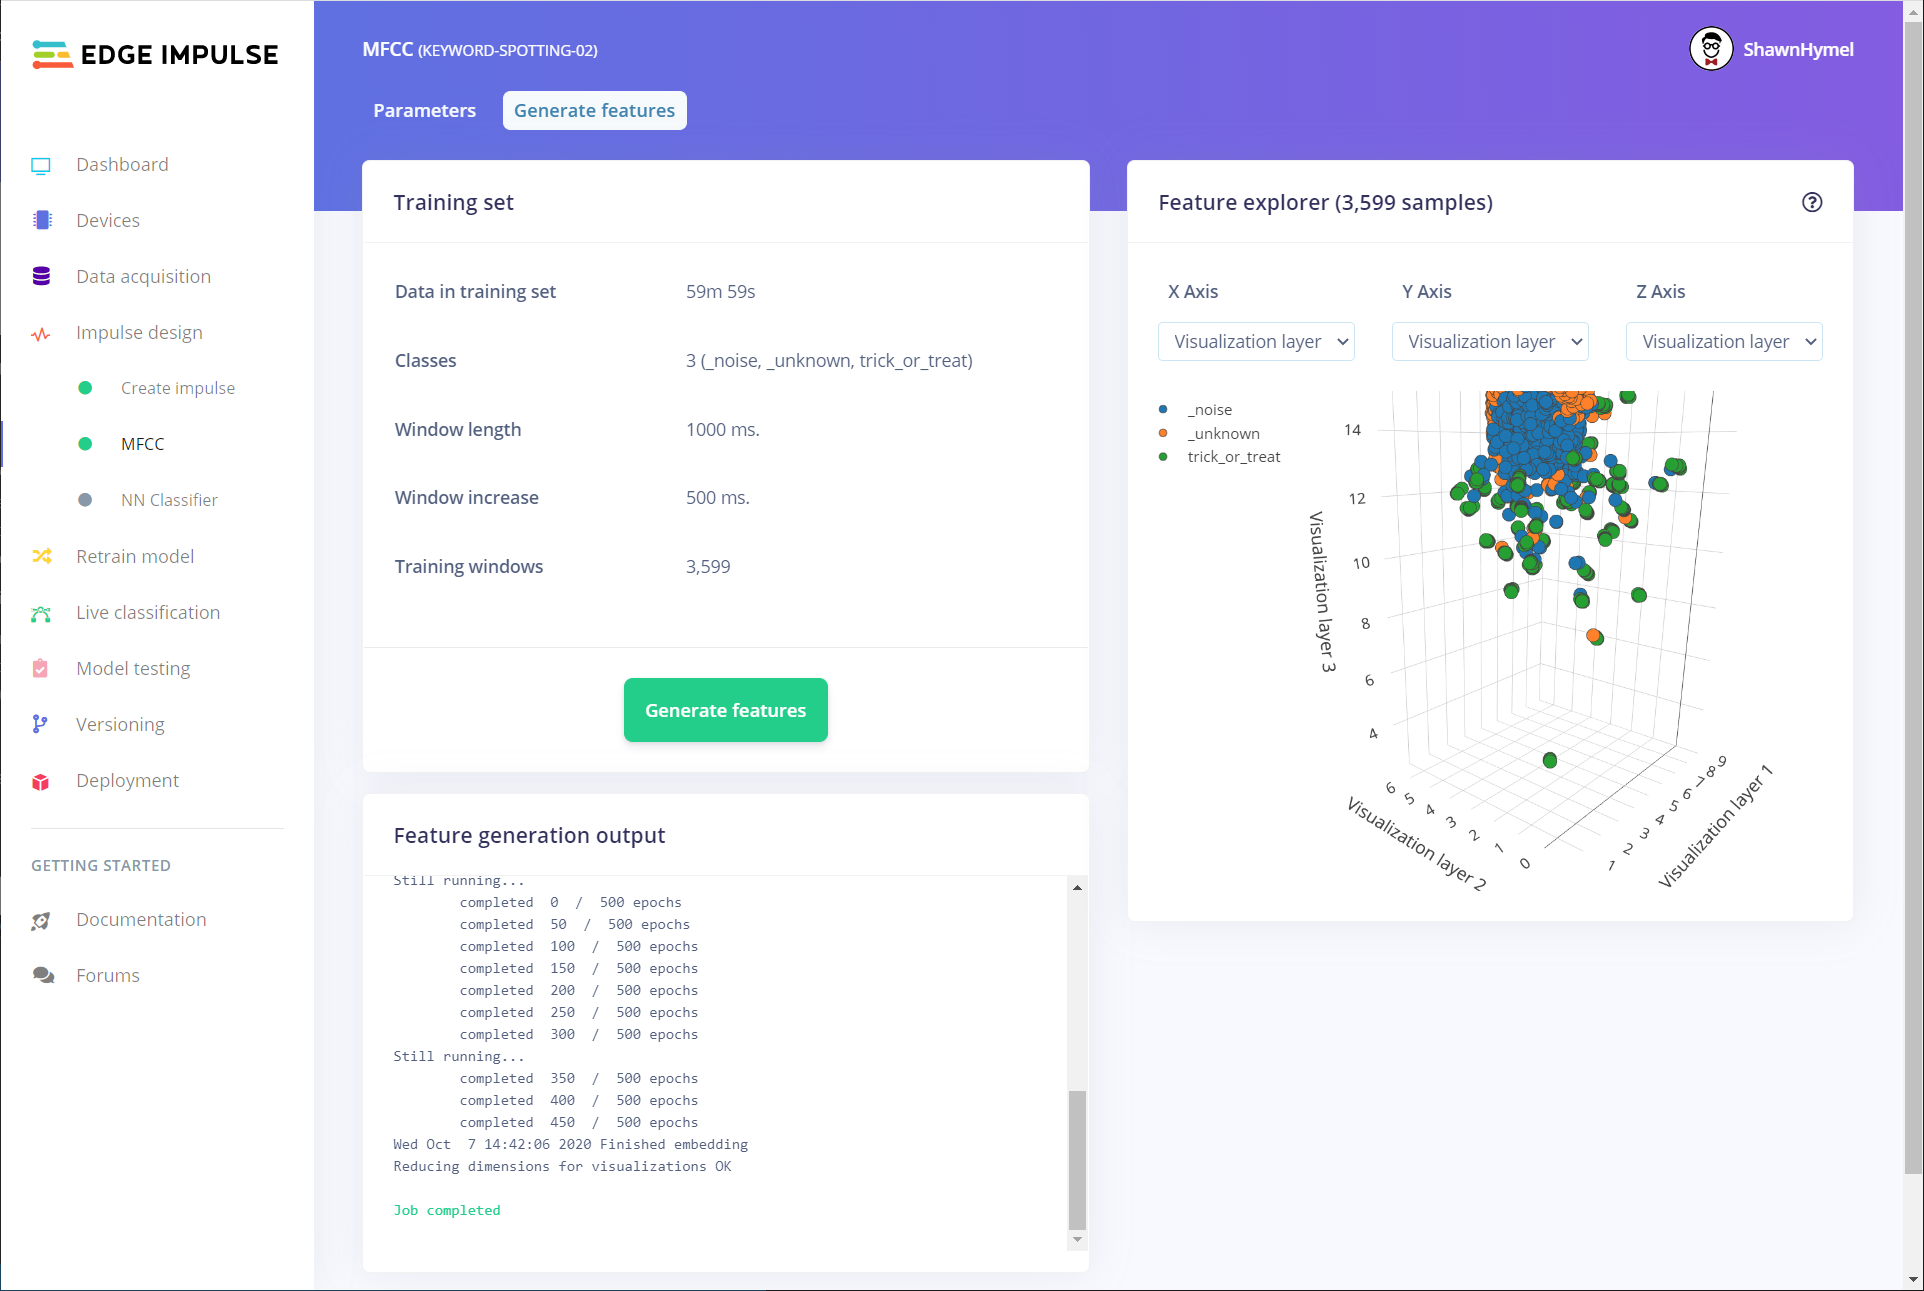
Click on MFCC under Impulse Design in the left-side pane. Click on the Generate Features tab, and click the Generate Features button. Edge Impulse will convert all audio samples into a series of Mel-frequency cepstral coefficients (MFCCs), which act as the features to be fed to the neural network. Wait until you see "Job completed" at the bottom before moving on.
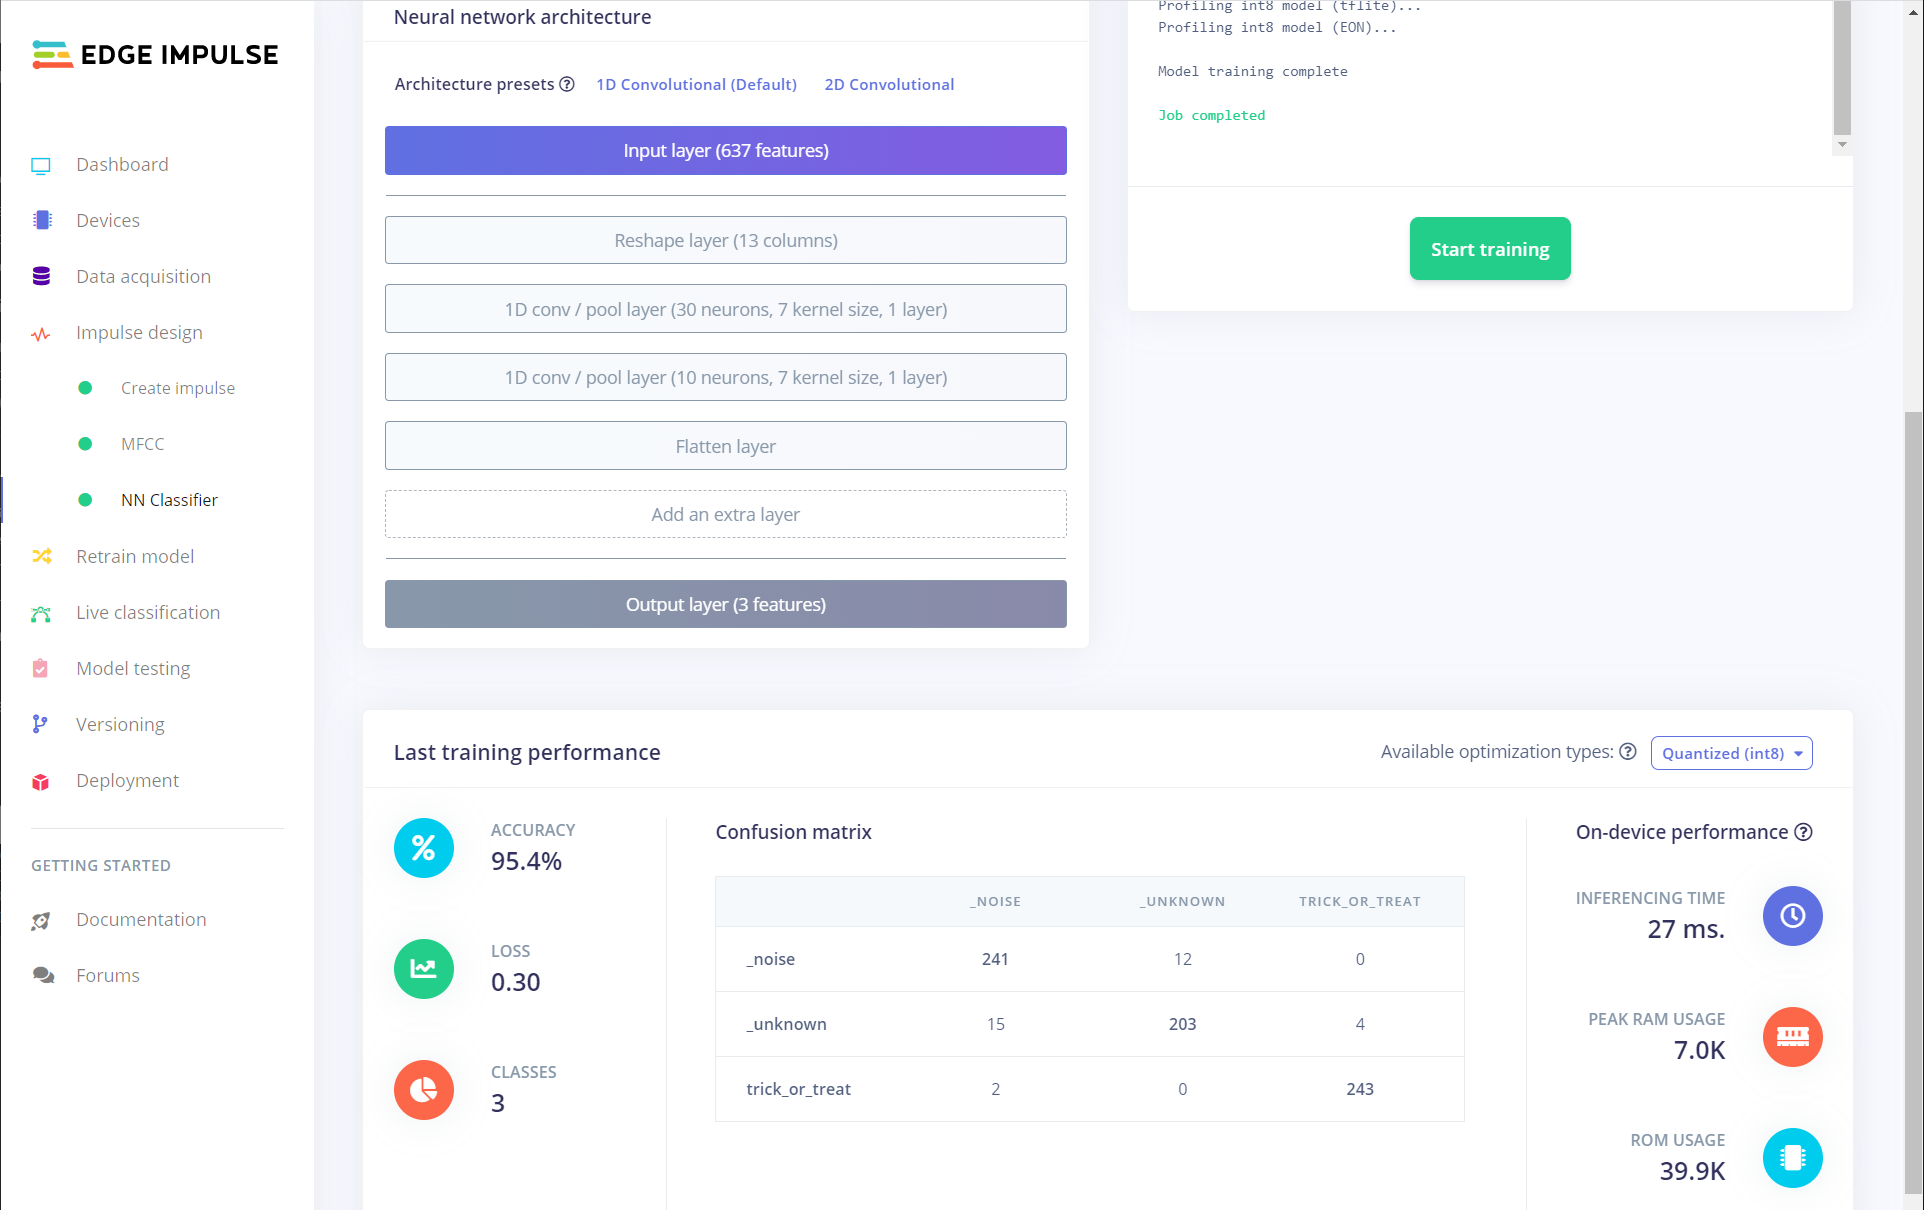
Click on the NN Classifier link under Impulse design to go to the neural network training block. Feel free to play around with the various parameters, including constructing your own neural network. However, I found that the defaults worked well for classifying 1-2 keywords (you may need to add more nodes or layers in the neural network if you want more than 2 keywords).
Press the Start Training button, and wait a few minutes while the neural network is trained using your sample set.
When it's done, scroll down, and you should see a confusion matrix along with some metrics giving you an indication of the performance of the trained model.
I recommend heading to the Model Testing section to test the performance of the model on your test samples, which were not used in training.
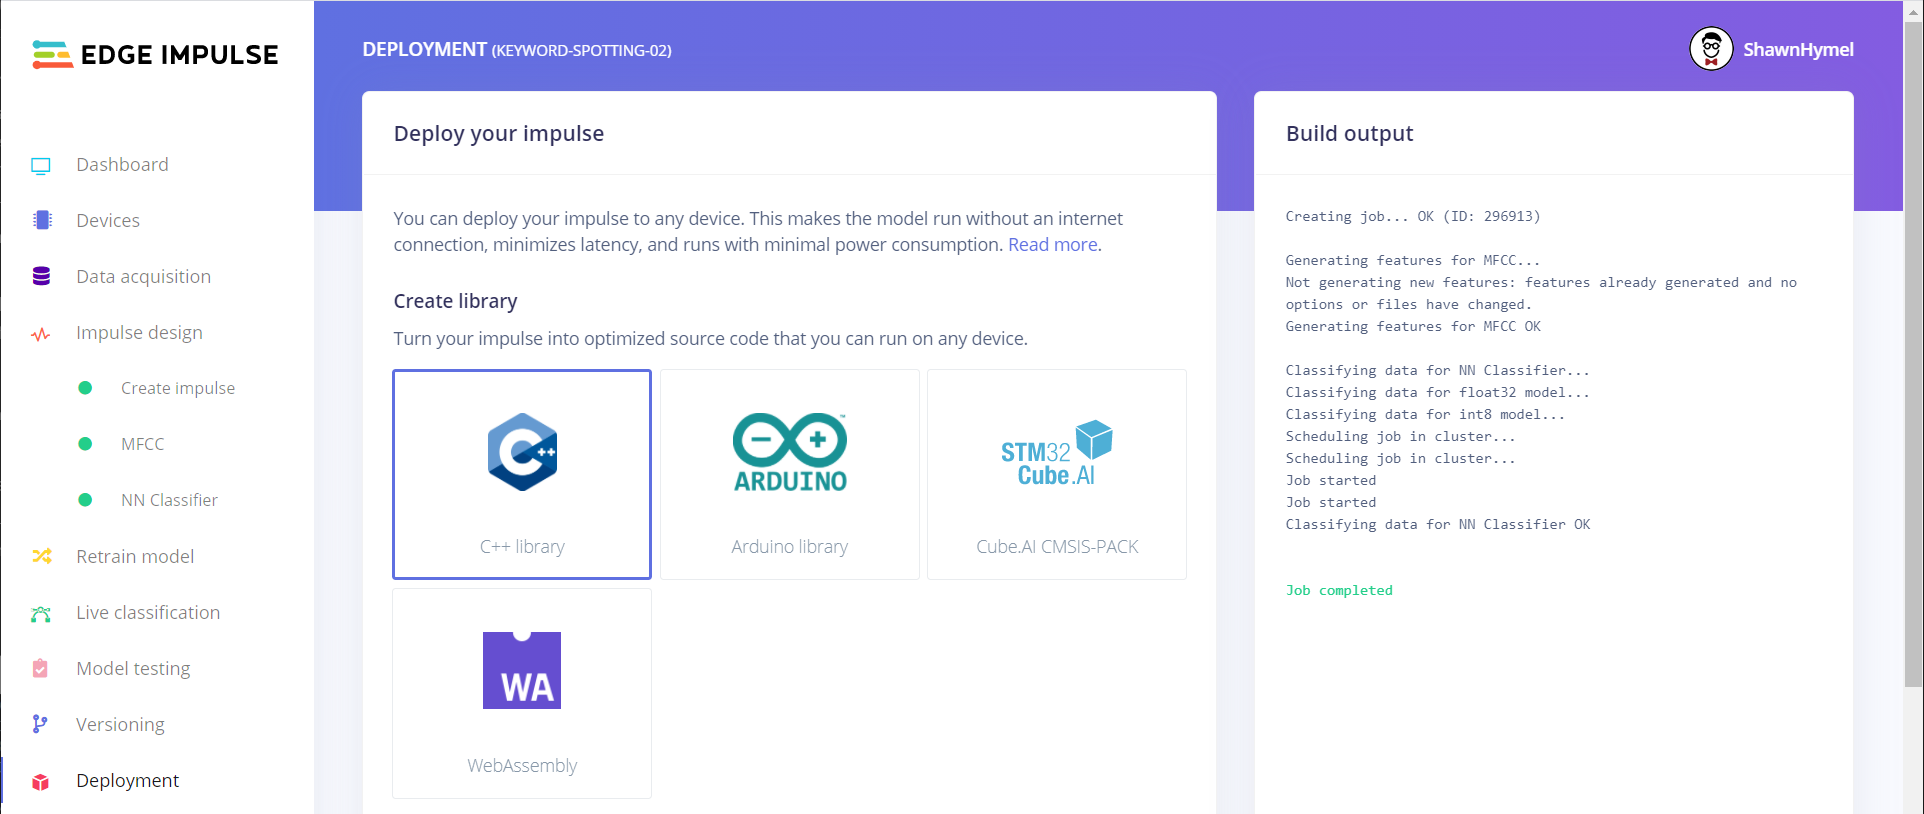
Click on the Deployment link in the left pane. If you are using an STM32 Nucleo board, select the C++ library option, which will build a raw C++ library using TensorFlow Lite and our model.
If you are using the Arduino Nano 33 BLE Sense, select the Arduino library option.
Feel free to click the Analyze button at the bottom to get an idea of how long it will take to perform inference along with the required memory to store and run your model (the default assumes an 80 MHz ARM Cortex-M4).
Leave the EON compiler enabled and and Quantized (int8) selected. Click Build, which will automatically download a .zip file containing your model and everything you need to perform inference.
Note: This has only been tested with the Arduino Nano 33 BLE Sense.
You should Add .ZIP Library and use one of the included examples as a template for your program.
Follow the instructions in this readme to see how to use the Arduino library.
Unzip the downloaded library file, and you'll see that it contains a bunch of source code. The directory structure should look like the following:
|- <edge-impulse-project-name>
|--- edge-impulse-sdk (libraries needed to run inference)
|----- ...
|--- model-parameters
|----- dsp_blocks.h (details about feature extraction)
|----- model_metadata.h (details about the model)
|--- tflite-model
|----- trained_model_compiled.cpp (model as byte array and supporting functions)
|----- trained_model_compiled.h (declarations of supporting functions)
The basic idea behind the Edge Impulse C++ library is that you would include it in your project and link to the various files in it with your build system (e.g. make). However, the library comes with a bunch of code to support a variety of microcontrollers and build systems. You should remove the folders that are not needed by your microcontroller (building with them will likely fail).
I recommend starting with one of the demo embedded projects in this repository to see how to include the Edge Impulse library. If you would like to use the library in your own build system, skip to the Importing the Edge Impulse library section below.
Download and install STM32CubeIDE, accepting all the defaults.
Download this repository and unzip it (note that on Windows, you may need to use a tool like 7-Zip to avoid the "Path too long" error).
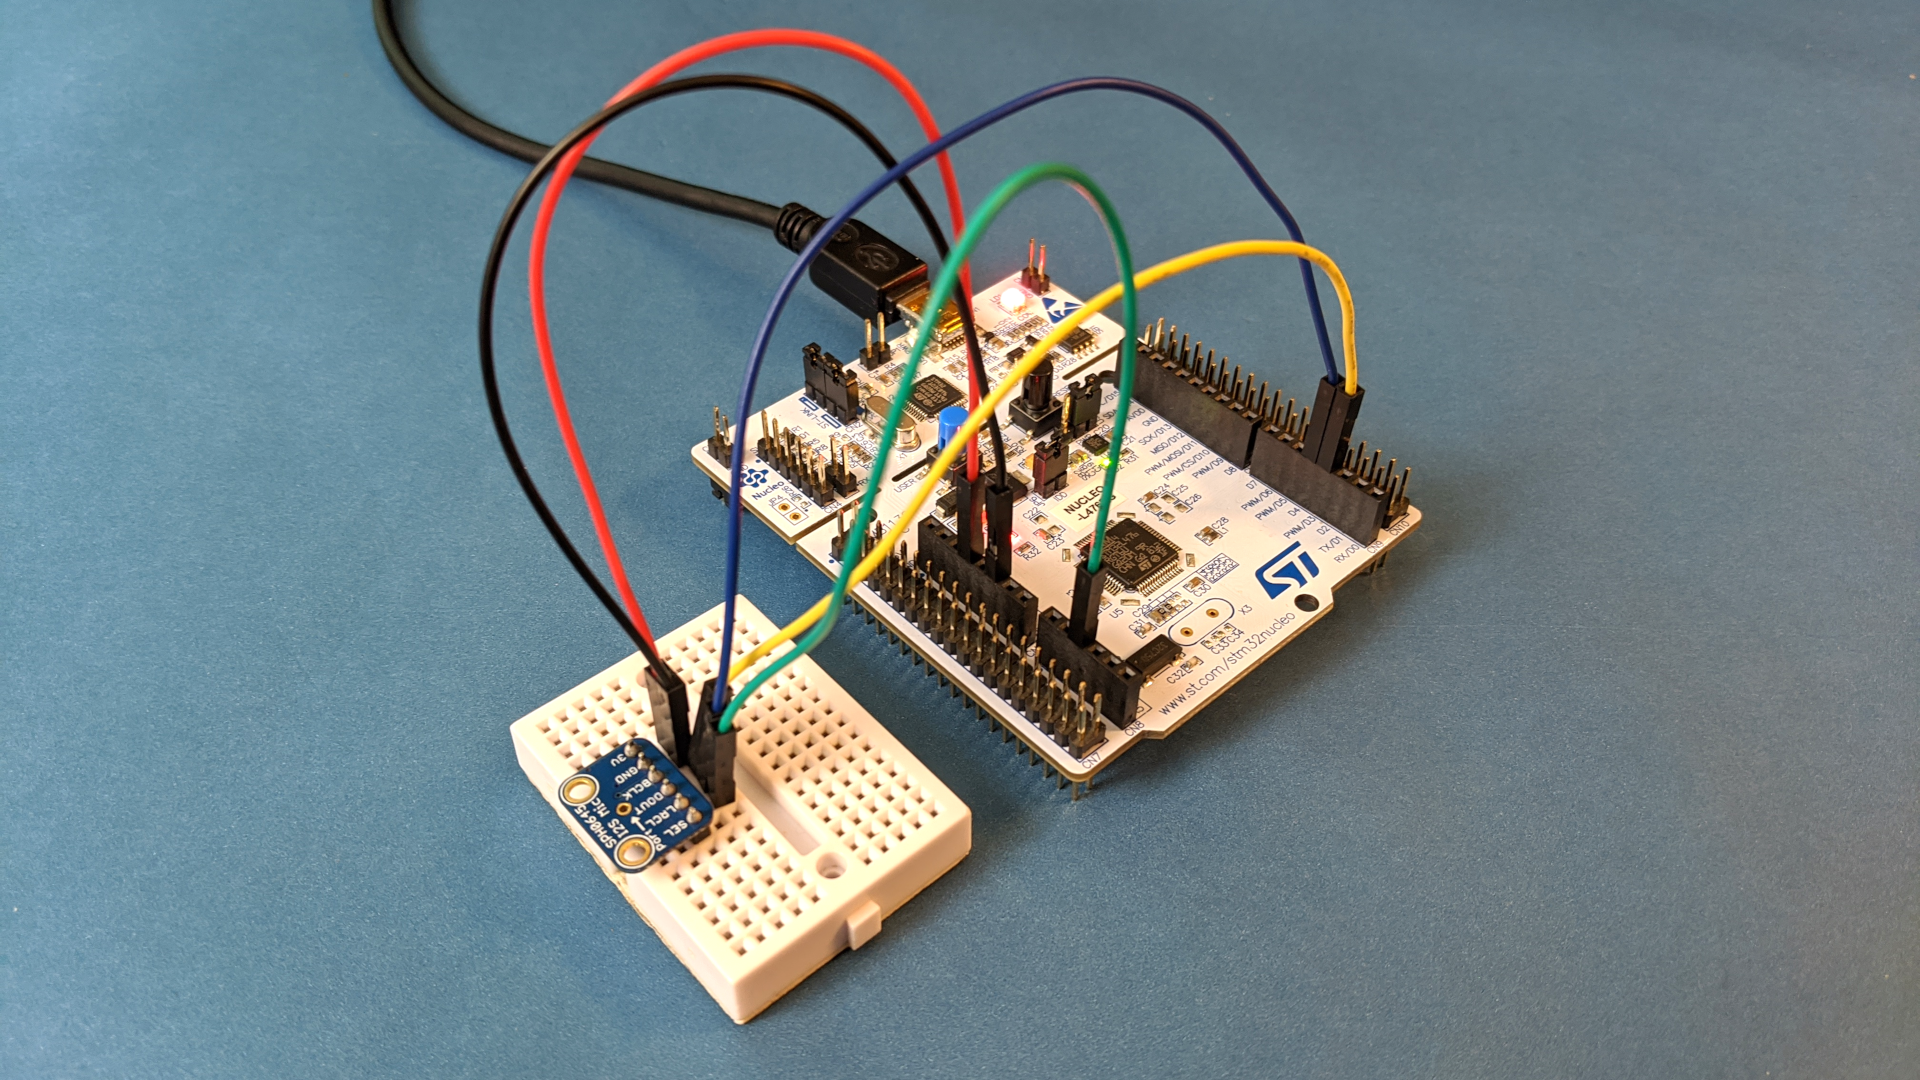
Follow the README instructions in your desired demo project (e.g. nucleo-l476-keyword-spotting) to connect the microphone to your STM32 board and run the demo with your custom-trained neural network.
Note: Full tutorial coming soon. For now, here are some notes on what you need to do. It's written for STM32CubeIDE (because that's what I'm familiar with), but feel free to extrapolate to your own build system.
If you're planning on importing the library into your own build system, you should remove these folders from the downloaded Edge Impulse library:
- Delete edge-impulse-sdk/utensor (uTensor is an alternative to TensorFlow Lite)
- Delete edge-impulse-sdk/tensorflow/lite/micro/testing (the testing directory contains test code that should not be compiled)
- Delete all but stm32-cubeai folder in edge-impulse-sdk/porting (you want to keep the porting folder for your particular microcontroller family)
- Delete ei_run_classifier_c.cpp and ei_run_classifier_c.h in edge-impulse-sdk/classifier
In your build system, add the various folders to your build system's path so that it can find the header and source folders. To see which folders you should include in the build path, download one of the STM32CubeIDE demo projects and go to Project > Properties > C/C++ General > Paths and Symbols > Includes and Paths and Symbols > Source Location.
For fastest inference, compile with the following preprocessor flags:
-DEI_CLASSIFIER_TFLITE_ENABLE_CMSIS_NN=1-DEIDSP_QUANTIZE_FILTERBANK=0
Unless otherwise noted (e.g. STM32CubeIDE projects have their own licenses), code is licensed under the MIT license:
The MIT License (MIT)

Copyright (c) 2020 Shawn Hymel

Permission is hereby granted, free of charge, to any person obtaining a copy
of this software and associated documentation files (the "Software"), to deal
in the Software without restriction, including without limitation the rights
to use, copy, modify, merge, publish, distribute, sublicense, and/or sell
copies of the Software, and to permit persons to whom the Software is
furnished to do so, subject to the following conditions:
The above copyright notice and this permission notice shall be included in all
copies or substantial portions of the Software.

THE SOFTWARE IS PROVIDED "AS IS", WITHOUT WARRANTY OF ANY KIND, EXPRESS OR
IMPLIED, INCLUDING BUT NOT LIMITED TO THE WARRANTIES OF MERCHANTABILITY,
FITNESS FOR A PARTICULAR PURPOSE AND NONINFRINGEMENT. IN NO EVENT SHALL THE
AUTHORS OR COPYRIGHT HOLDERS BE LIABLE FOR ANY CLAIM, DAMAGES OR OTHER
LIABILITY, WHETHER IN AN ACTION OF CONTRACT, TORT OR OTHERWISE, ARISING FROM,
OUT OF OR IN CONNECTION WITH THE SOFTWARE OR THE USE OR OTHER DEALINGS IN THE
SOFTWARE.
This tutorial is licensed under Creative Commons, Attribution 4.0 International (CC BY 4.0)
